Home Workout for Belly Fat: 15-Minute Daily Routine (No Equipment)
A science-backed 15-minute daily home workout to reduce belly fat — no equipment needed. 8 exercises with step-by-step instructions, 4-week progression plan, and beginner modifications.

Belly fat is the most common fitness complaint among Indians — and the most misunderstood. Walk into any gym or open any diet article and you will find promises of "targeted belly fat burning" through specific exercises or foods. The science is clear: you cannot spot-reduce fat from any specific area of the body.
But here is what exercise CAN do: burn overall body fat, build core muscle that improves posture and appearance, and — when paired with a calorie deficit — progressively reduce visceral fat (the dangerous fat around your internal organs that accumulates around the belly).
This 15-minute daily routine is designed to maximise calorie burn, activate your core muscles, and build the exercise habit that makes long-term belly fat reduction possible. No equipment. No gym. Just 15 minutes, a small clear space, and consistency.
For the diet side of belly fat reduction — which accounts for roughly 70–80% of results — read our companion guide on how to reduce belly fat naturally. This post focuses exclusively on the exercise routine.
The Truth About "Spot Reduction"
Before diving into the exercises, this needs to be addressed directly: doing 500 crunches per day will not give you a flat stomach if you are eating in a calorie surplus.
Here is why. Your body stores and burns fat systemically — it does not pull fat from the area closest to the muscle being worked. When you do crunches, you strengthen and build your abdominal muscles. But the fat layer above those muscles is reduced only through an overall energy deficit — burning more calories than you consume across your whole body.
What the exercises in this routine DO achieve:
- Burn 100–200 calories in 15 minutes (significant contribution to daily deficit)
- Build core muscle — as fat decreases, the defined muscles become visible
- Improve insulin sensitivity — exercise makes your cells more responsive to insulin, reducing fat storage tendency
- Reduce cortisol — the stress hormone that specifically promotes belly fat accumulation
- Increase your daily calorie burn — building muscle raises your resting metabolic rate
Consistency with this routine, combined with a moderate calorie deficit, produces real, visible results over 8–12 weeks.
The 15-Minute Workout Structure
← Swipe to compare →
| Phase | Duration | Purpose |
|---|---|---|
| Phase 1: Warm-Up | 3 minutes | Increase heart rate, lubricate joints, prepare muscles |
| Phase 2: Core + Cardio Circuit | 10 minutes | Fat burn + core activation |
| Phase 3: Cool-Down | 2 minutes | Heart rate recovery, flexibility |
Circuit structure (Phase 2): 8 exercises × 30 seconds work + 15 seconds rest = approximately 10 minutes
Total session: 15 minutes
Phase 1: Warm-Up (3 Minutes)
Never skip the warm-up. Cold muscles are injury-prone muscles, and jumping straight into intense core work can strain your lower back.
Exercise 1: March in Place (60 seconds) Lift knees to hip height alternately, swinging arms naturally. Gradually increase pace over 30 seconds.
Exercise 2: Arm Circles (30 seconds) Extend arms to the sides, make small circles for 15 seconds, then reverse direction. Opens shoulder joints and warms upper body.
Exercise 3: Hip Circles (30 seconds) Feet shoulder-width apart, hands on hips. Make large circles with your hips — 5 clockwise, 5 anti-clockwise. Warms the hip flexors and lower back.
Exercise 4: Torso Twists (60 seconds) Stand with feet hip-width apart, arms extended forward. Rotate your upper body left and right, keeping hips stable. Gradually increase range of motion.
Phase 2: Core + Cardio Circuit (10 Minutes)
Perform each exercise for 30 seconds, rest for 15 seconds, then move to the next. Complete the circuit once through — that is your 10 minutes.
Exercise 1: Mountain Climbers
What it works: Core (transverse abdominis, obliques), hip flexors, shoulders, cardiovascular system
How to do it:
- Start in a high plank position — hands directly below shoulders, body in a straight line from head to heels, toes on the floor.
- Pull your right knee toward your chest as far as comfortable, keeping hips level.
- Quickly switch — push right foot back and pull left knee forward.
- Continue alternating at a fast pace. The faster you go, the higher the calorie burn.
Beginner modification: Slow the pace significantly. Focus on keeping your hips from rising or sagging rather than speed.
Common mistake: Letting hips pike up toward the ceiling. Keep your core tight and hips level throughout.
Calories burned (30 seconds): Approximately 5–8 kcal
Mountain climbers are the single best exercise in this routine for belly fat. They engage your core isometrically (holding position) while simultaneously providing cardiovascular work. 30 seconds of good mountain climbers is equivalent to a short sprint in terms of effort.
Exercise 2: Crunches
What it works: Rectus abdominis (the "six-pack" muscle), hip flexors
How to do it:
- Lie on your back with knees bent, feet flat on the floor, hip-width apart.
- Place fingertips lightly behind your ears — do not pull your neck.
- Engage your core and curl your upper back off the floor, bringing your ribcage toward your pelvis.
- Pause at the top for 1 second, then slowly lower back down.
- Do not rest your head on the floor between reps — keep constant tension.
Beginner modification: Reduce the range of motion. Even lifting your shoulder blades 2–3 inches off the floor is effective if done with full core engagement.
Common mistake: Pulling the neck forward with the hands, straining the cervical spine. The movement comes from the abdominals — the hands are only there for light support.
Exercise 3: Bicycle Crunches
What it works: Obliques, rectus abdominis, hip flexors — the most effective crunch variation for total core activation
How to do it:
- Lie on your back, knees raised to 90 degrees, fingertips behind ears.
- Lift your shoulder blades off the floor.
- Extend your right leg straight (hovering above the floor) while rotating your right elbow toward your left knee.
- Switch — pull right knee in, extend left leg, rotate left elbow toward right knee.
- Continue in a smooth, controlled pedalling motion. Do not rush — control the rotation.
Beginner modification: Keep feet higher off the floor (less demanding on hip flexors) and reduce the rotation range.
Common mistake: Using momentum to swing the upper body rather than actively rotating the obliques. Slow it down and feel the contraction.
Exercise 4: Leg Raises
What it works: Lower rectus abdominis, hip flexors — targets the lower belly specifically
How to do it:
- Lie flat on your back, hands flat on the floor beside your hips or lightly placed under your lower back for support.
- Keep both legs straight (or slightly bent if needed) and raise them together until they are perpendicular to the floor.
- Slowly lower them back toward the floor without touching it — stop 2–3 inches above the floor.
- Raise again immediately. The lowering phase (eccentric) is where most of the work happens.
Beginner modification: Bend your knees to a 90-degree angle and lift bent legs rather than straight legs. This significantly reduces the load on hip flexors.
Common mistake: Allowing the lower back to arch off the floor during the lowering phase. If this happens, place your hands under your glutes for support and reduce the range of motion.
If you have lower back pain, skip leg raises and replace them with dead bugs (lying flat, arms extended toward ceiling, alternate lowering opposite arm and leg toward the floor). Dead bugs work the same muscles with much lower spinal load.
Exercise 5: Plank Hold
What it works: Entire core (transverse abdominis, obliques, rectus abdominis), shoulders, glutes — the most complete core exercise
How to do it:
- Start on your forearms with elbows directly below shoulders, forearms flat on the floor.
- Lift your body into a straight line from head to heels, supported on forearms and toes.
- Squeeze your glutes and engage your core — imagine pulling your belly button toward your spine.
- Hold for 30 seconds. Do not hold your breath — breathe steadily.
Beginner modification: Drop to your knees instead of toes. Maintain the straight line from knees to head.
Common mistake: Letting the hips sag (creates lower back stress) or pike upward (reduces core engagement). Use a mirror or camera to check your form.
Exercise 6: Jumping Jacks
What it works: Cardiovascular system, full body — provides the cardio element that burns calories and keeps heart rate elevated
How to do it:
- Stand with feet together, arms at your sides.
- Jump, spreading feet beyond shoulder-width and raising arms overhead simultaneously.
- Jump back to starting position. Repeat continuously at a brisk pace.
Beginner modification: Step side to side instead of jumping — step right foot out while raising right arm, then bring it back, then step left. This removes the impact while maintaining the movement pattern.
Common mistake: Landing heavily on heels. Land softly on the balls of your feet to protect your knees and reduce impact noise (helpful for apartment dwellers).
Exercise 7: Burpees (Modified)
What it works: Full body — one of the highest calorie-burning bodyweight exercises. Involves core, chest, shoulders, legs, and cardiovascular system simultaneously.
How to do it (modified — no push-up):
- Stand with feet shoulder-width apart.
- Bend down and place hands on the floor in front of you.
- Jump or step your feet back into a high plank position.
- Hold for 1 second (brief core engagement).
- Jump or step feet back toward your hands.
- Stand up and jump, raising arms overhead.
- Land softly and repeat.
Beginner modification: Remove the jump entirely. Step back to plank, step forward, and stand up without jumping. This is still an effective full-body exercise.
Common mistake: Allowing the lower back to sag in the plank position mid-burpee. Keep core tight throughout.
Even 10 good burpees in 30 seconds burns significantly more calories than 30 seconds of crunches. If you can only do 5–6 burpees in 30 seconds, that is fine — quality over quantity. Your speed will increase naturally within 2 weeks of consistent practice.
Exercise 8: Russian Twists
What it works: Obliques, transverse abdominis — the muscles that define your waistline
How to do it:
- Sit on the floor with knees bent, feet flat on the floor.
- Lean back slightly (approximately 45 degrees) until you feel your core engage.
- Lift feet slightly off the floor (or keep them on the floor for the beginner version).
- Clasp hands together in front of your chest.
- Rotate your upper body to the right, bringing your hands toward the floor beside your right hip.
- Rotate to the left. This is one rep. Continue alternating.
Beginner modification: Keep feet flat on the floor throughout. This reduces the hip flexor demand and lets you focus on the rotational core movement.
Progression: Hold a water bottle (0.5–1 litre) to add resistance as you get stronger.
Phase 3: Cool-Down (2 Minutes)
Child's Pose (45 seconds): Kneel on the floor, sit back on your heels, and extend arms forward on the floor. Breathe deeply — this releases lower back tension built up during the workout.
Lying Twist (30 seconds each side): Lie on your back. Pull your right knee to your chest, then guide it across your body to the left while extending your right arm to the right. Hold 30 seconds, switch sides.
Cat-Cow Stretch (45 seconds): On hands and knees, alternate between arching your back upward (cat) and letting it sag downward (cow) in rhythm with your breath.
6-Day Weekly Schedule
← Swipe to compare →
| Day | Session | Notes |
|---|---|---|
| Monday | Full 15-min routine | Start of week — full energy |
| Tuesday | Full 15-min routine | |
| Wednesday | Full 15-min routine | |
| Thursday | Rest or gentle walk | Active recovery |
| Friday | Full 15-min routine | |
| Saturday | Full 15-min routine | |
| Sunday | Rest | Full recovery |
5 sessions per week is the sweet spot. More than 6 sessions without adequate rest leads to overuse injury of the hip flexors and lower back — common in people who do intense core work daily without recovery.
4-Week Progression Plan
Increase intensity gradually to avoid plateaus and continue making progress.
← Swipe to compare →
| Week | Change | Goal |
|---|---|---|
| Week 1 | 30 sec work / 15 sec rest — standard | Build the habit, learn the exercises |
| Week 2 | 35 sec work / 10 sec rest | Increase time under tension |
| Week 3 | 40 sec work / 10 sec rest + add 1 extra circuit round | Significantly higher calorie burn |
| Week 4 | 45 sec work / 10 sec rest + hold water bottle for Russian twists | Peak intensity for the month |
After Week 4, take 3–5 days of lighter activity, then restart the progression or move to a more advanced workout like HIIT for beginners at home.
📖 Read Also:
5 Best Resistance Bands for Home Workout in India (2026)A water bottle works for Week 4, but a proper loop band gives you adjustable resistance for Russian twists and the rest of this routine as you progress further.
How to Track Progress (Not Just Weight)
Weight is a poor short-term indicator of belly fat loss because:
- Muscle weighs more than fat
- Water retention fluctuates by 1–3 kg daily
- Fat loss may be happening even if the scale is not moving
Better measurements:
← Swipe to compare →
| Metric | How to Measure | How Often |
|---|---|---|
| Waist circumference | Tape measure at navel, relaxed | Once per week |
| Hip circumference | Tape measure at widest point | Once per week |
| Waist-to-hip ratio | Waist ÷ Hip (target: below 0.85 for women, below 0.90 for men) | Once per week |
| Progress photos | Same time, same lighting, same pose | Every 2 weeks |
| How clothes fit | Jeans, kurta, saree blouse waistband | Ongoing |
Realistic Results Timeline
← Swipe to compare →
| Timeframe | What to Expect |
|---|---|
| Week 1–2 | Better sleep, slightly more energy, mild muscle soreness |
| Week 3–4 | Noticeably stronger core, improved posture, 1–2 cm waist reduction |
| Week 6–8 | Visible waist definition, clothes fitting differently |
| Month 3+ | Significant reduction in belly measurement, visible core muscle |
These timelines assume you are also managing your diet — specifically maintaining a calorie deficit. Exercise alone, without dietary awareness, typically produces only modest fat loss results. The workout burns 100–200 calories per session; a single samosa replaces that entirely. Both diet and exercise are necessary for visible belly fat reduction.
FAQ
Can I do this workout every day?
5 days per week is recommended. Daily core work without rest days leads to hip flexor tightness, lower back fatigue, and reduced workout quality. Rest days are when your muscles repair and strengthen — they are part of the training, not absence from it.
How long before I see results?
Visible results typically appear at 6–8 weeks with consistent effort (5 sessions/week) and a moderate calorie deficit. Internal improvements — better core strength, less lower back pain, improved posture — often appear within 2–3 weeks.
Is this workout suitable for beginners with no fitness experience?
Yes — use the beginner modifications provided for each exercise. Start at the lower intensity (30 sec work / 15 sec rest) and focus on learning correct form before increasing speed or duration. The routine is specifically designed to be accessible to fitness beginners.
Can I do this workout if I have lower back pain?
Consult a physiotherapist before starting any core workout if you have diagnosed lower back conditions. For mild lower back discomfort, avoid leg raises and replace with dead bugs, reduce plank duration, and ensure your form is correct throughout. Core strengthening generally helps lower back pain long-term — but incorrect form can worsen it short-term.
Will doing more crunches give me a flat stomach faster?
No. More crunches beyond what this plan provides will not accelerate fat loss. Fat loss is driven by your calorie deficit — not by exercise volume in a specific area. Additional crunches will build your abdominal muscles further, which is beneficial, but the visible result (flat stomach) depends primarily on reducing the fat layer through diet.
Can I do this workout after eating?
Wait at least 90 minutes after a full meal. Working out on a full stomach causes discomfort, nausea, and reduced performance. A small snack (banana, dates) 30 minutes before is fine.
Free Tools to Help You
Put this article into action — use our free calculators to get your personalized numbers.
Was this article helpful?
Want More Tips Like This?
Join 1,000+ readers getting weekly fitness, diet, and wellness tips + FREE meal plan
No spam, ever. Unsubscribe anytime.

About the Author: Ashwani
Fitness influencer and wellness writer helping Indians build healthier lifestyles.
Read more about us →Comments
Leave a Comment
Your email will not be published. Comments are reviewed before appearing.
You Might Also Like
Continue your wellness journey
16 min read
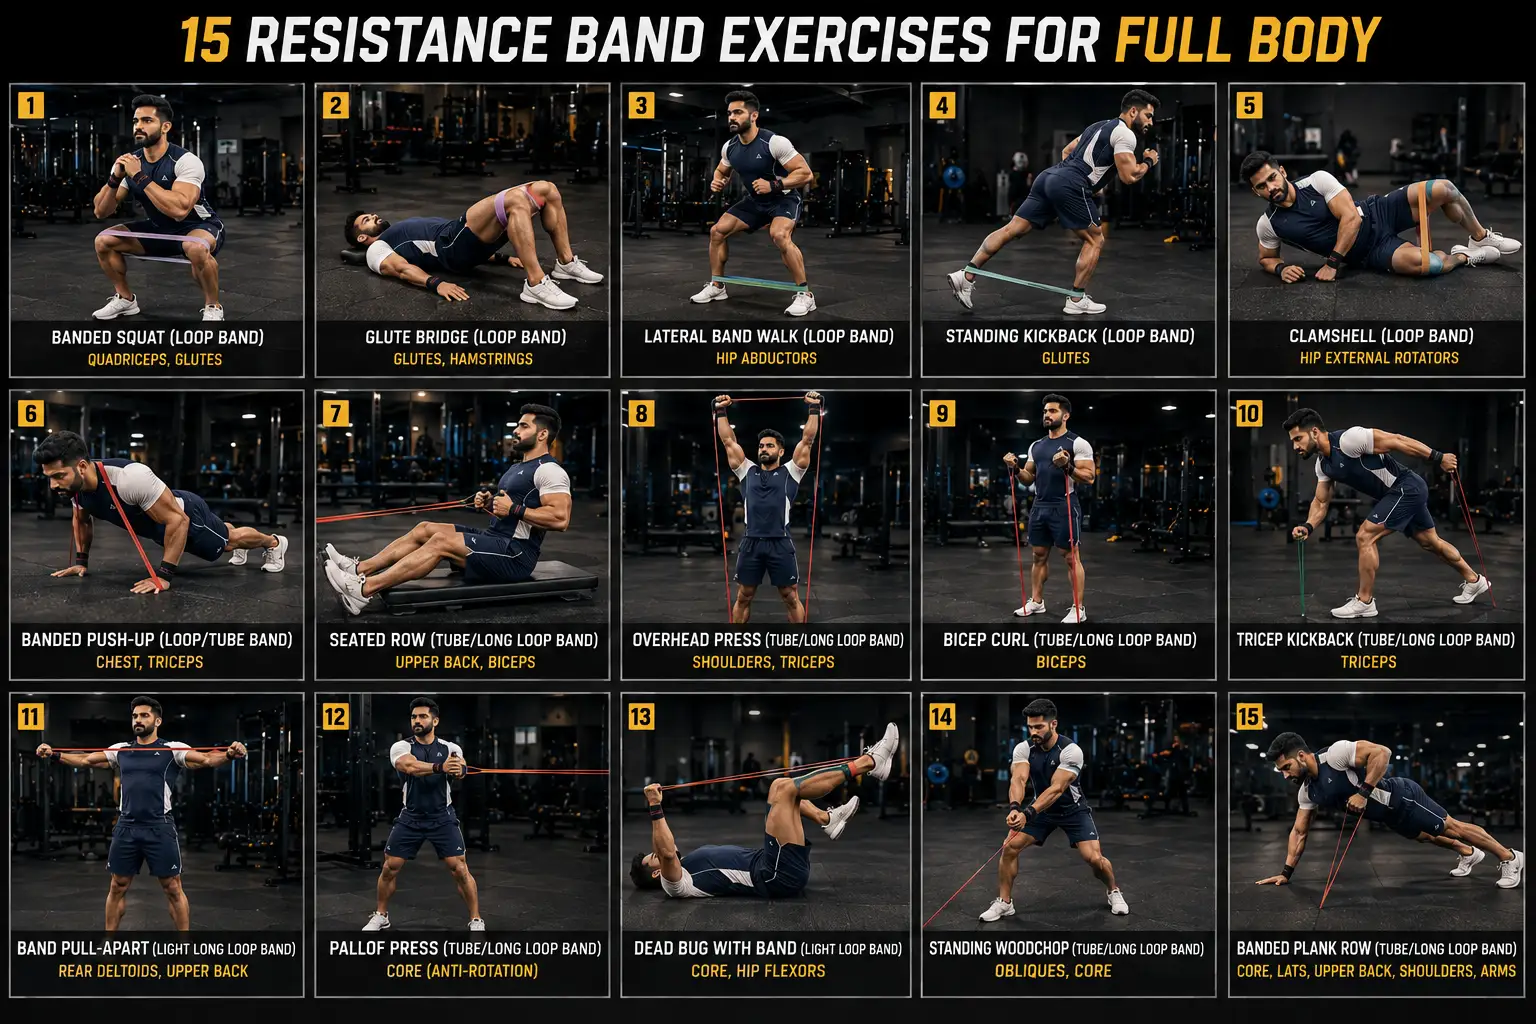
15 Resistance Band Exercises for Full Body
A complete full-body resistance band workout you can do in the space of a yoga mat — 15 exercises with form cues, sets and reps, and a 30-minute routine built for Indian homes with no bench, no rack and no door anchor.
14 min read
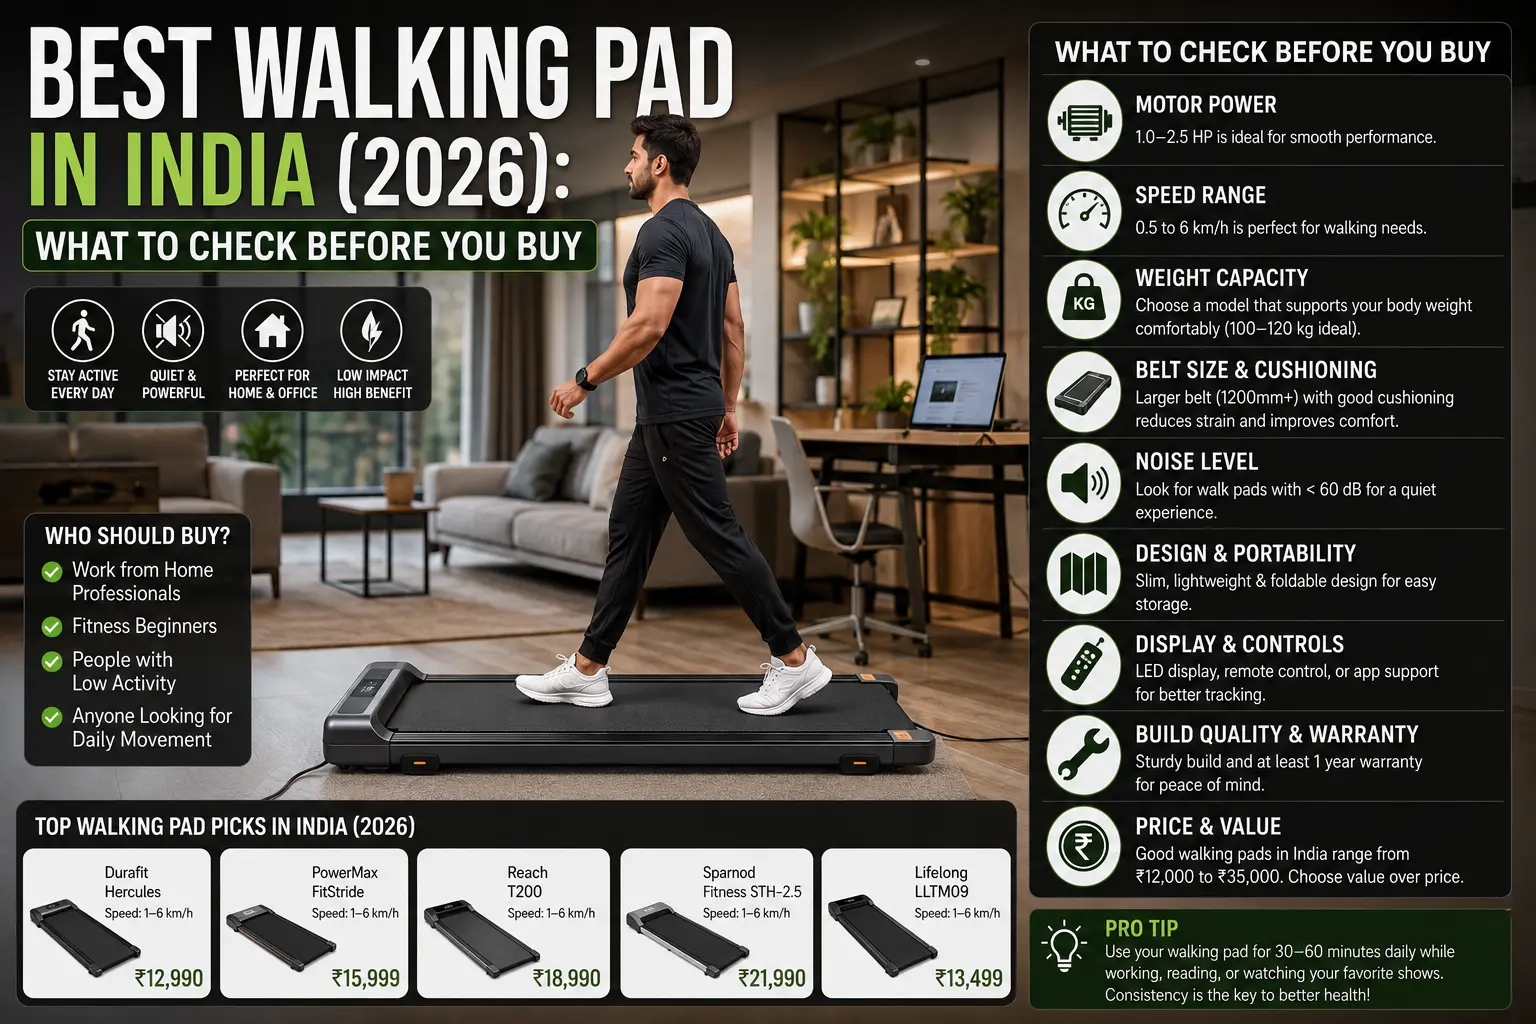
Best Walking Pad in India (2026): What to Check Before You Buy
Walking pads solve a real Indian problem — you cannot walk outdoors when the AQI is 300 or the monsoon has not stopped for a week. Here is what actually matters when buying one, and who should not buy one at all.

14 min read
Best Yoga Mat in India (2026): 5 Mats Tested & Ranked
I compared 5 of the most popular yoga mats sold on Amazon India — Boldfit, Strauss, Amazon Basics, Lifelong, and Wakefit — testing grip, cushioning, thickness, and durability to find the one actually worth your money in 2026.